表单示例
目前,框架使用 Bootstrap 5 ,它具有一个简单易用的网格系统,这个网格系统最多使用 12 列,允许您创建任何类型的布局。 它是响应式的,并包含许多组件,如下拉菜单、下拉按钮、按钮组、导航、导航栏、选项卡、面包屑、徽章、进度条等。
默认编辑表单模板
如果实体项及其所有者没有自己的编辑表单模板,则使用此模板创建编辑表单。
<div class="default-edit default-details-edit">
<div class="form-body">
<div class="edit-body"></div>
</div>
<div class="form-footer">
<button type="button" id="ok-btn" class="btn btn-primary">
<i class="bi bi-check-square"></i> OK<small class="muted"> [Ctrl+Enter]</small>
</button>
<button type="button" id="cancel-btn" class="btn btn-secondary">
<i class="bi bi-x-square"></i> Cancel
</button>
</div>
</div>
下面的事件位于任务客户端模块中,当任何实体项的编辑表单刚刚创建时会触发该事件。
它使用 create_inputs 方法在 class 为 "edit-body" 的 div 中创建输入控件。但在此之前,它检查实体项的客户端模块中是否定义了 init_inputs 函数,该函数可用于指定方法的 options 参数。
然后,它为 OK 和 Cancel 按钮分配 jQuery 事件。
function on_edit_form_created(item) {
    var options = {
            col_count: 1
        };

    if (item.init_inputs) {
        item.init_inputs(item, options);
    }

    item.create_inputs(item.edit_form.find(".edit-body"), options);

    item.edit_form.find("#cancel-btn").on('click.task', function(e) {
        item.cancel_edit(e)
    });
    item.edit_form.find("#ok-btn").on('click.task', function() {
        item.apply_record()
    });
}
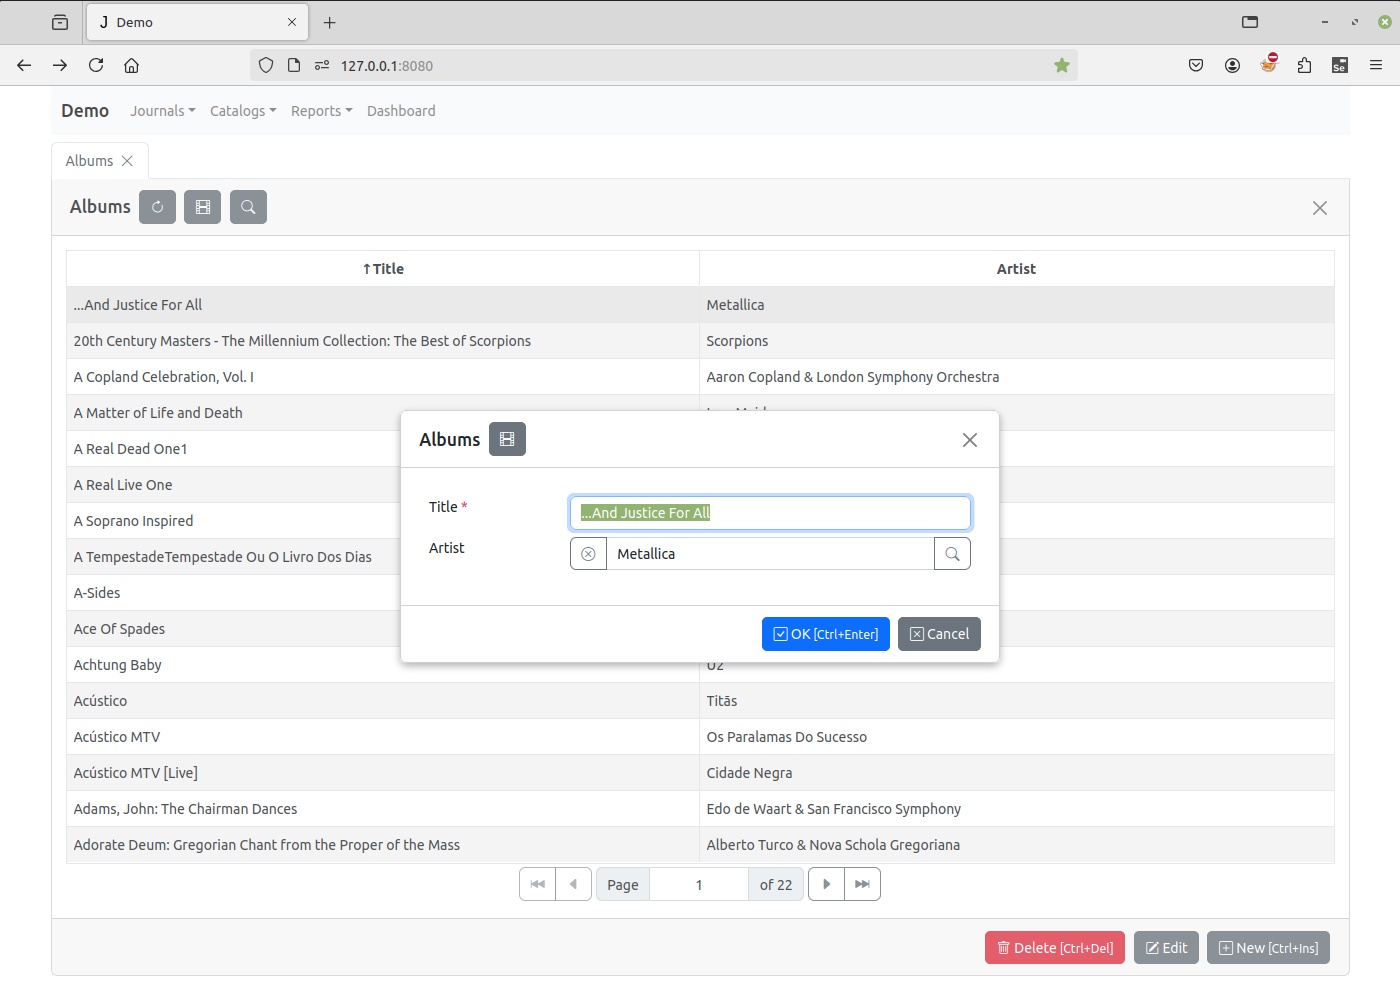
主表目录中的 专辑(Albums) 主表项的编辑表单如下所示:
备注
如果没有具有相应 id 的按钮,上述代码不会生成异常。
如果您想在实体项的客户端模块的相应事件中,覆盖任务客户端模块中声明的按钮的 JQuery 事件,可以使用 jQuery 的 off 方法:
item.edit_form.find("#ok-btn")
    .off('click.task')
    .on('click', function() { some_other_function(item) });
如果表单中没有相应的容器, create_inputs 方法不会执行任何操作。
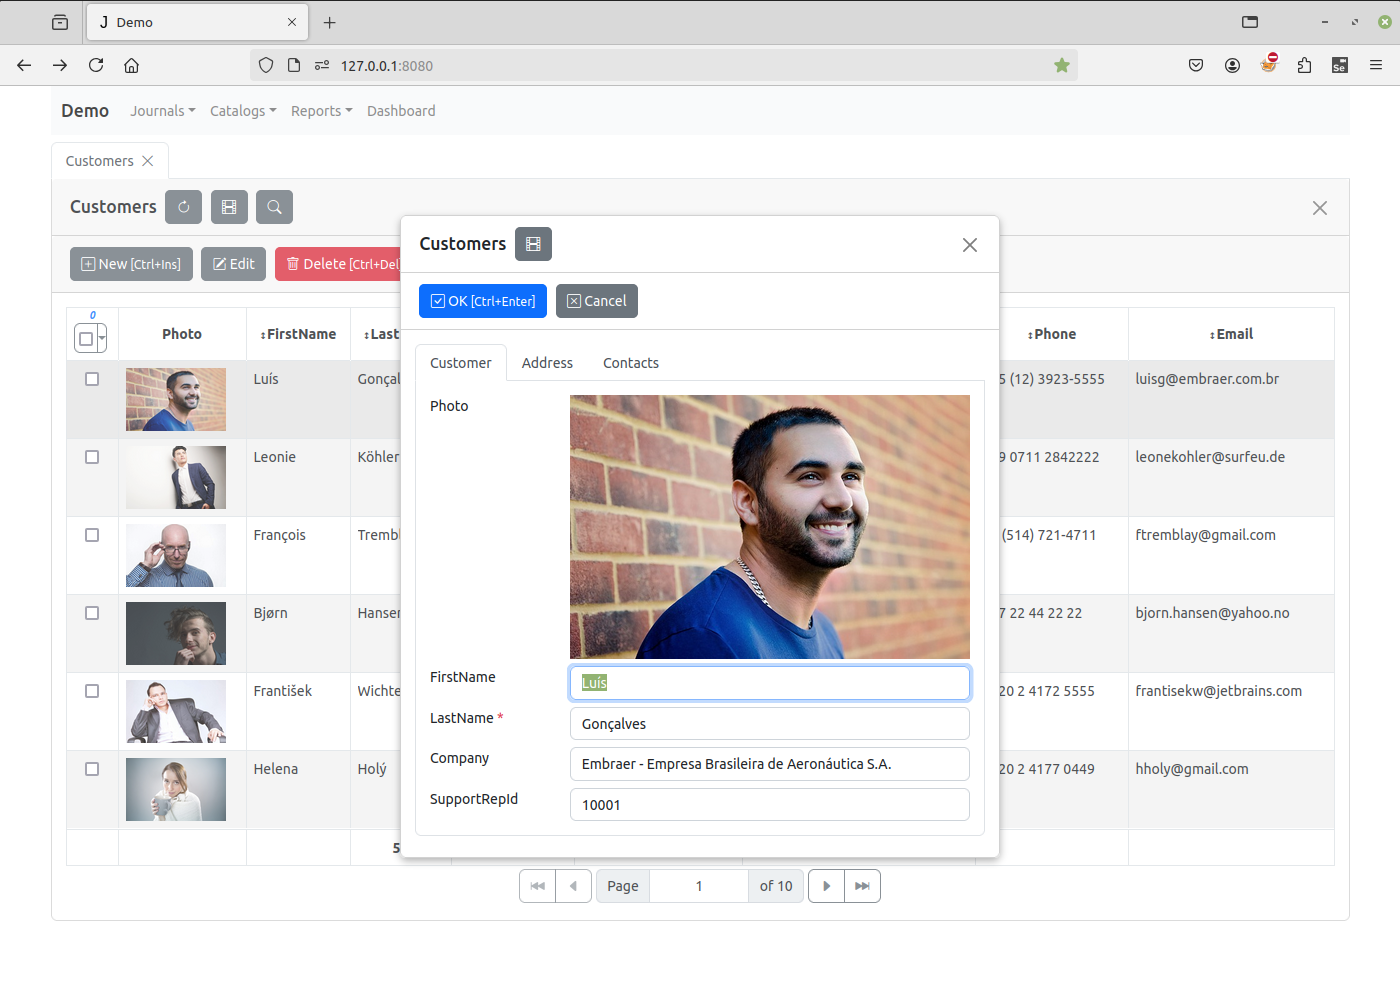
带选项卡的编辑表单模板
此示例使用 Bootstrap 3 的选项卡。由于 Bootstrap 5 不使用 href,需要对示例代码进行更新:
<div class="customers-edit">
<div class="form-body">
<ul class="nav nav-tabs" id="customer-tabs">
<li class="active"><a href="#cust-name">Customer</a></li>
<li><a href="#cust-address">Address</a></li>
<li><a href="#cust-contact">Contact</a></li>
</ul>
<div class="tab-content">
<div class="tab-pane active" id="cust-name">
</div>
<div class="tab-pane" id="cust-address">
</div>
<div class="tab-pane" id="cust-contact">
</div>
</div>
</div>
<div class="form-footer">
<button type="button" id="ok-btn" class="btn btn-ary expanded-btn">
<i class="icon-ok"></i> OK<small class="muted"> [Ctrl+Enter]</small>
</button>
<button type="button" id="cancel-btn" class="btn expanded-btn">
<i class="icon-remove"></i> Cancel
</button>
</div>
</div>
以下事件处理程序声明在 客户(Customers) 实体项的客户端模块中。它为与选项卡对应的窗格创建输入控件:它会为面板创建对应的输入控件,这些面板分别对应各个选项卡:
function on_edit_form_created(item) {
    item.edit_form.find('#customer-tabs a').click(function (e) {
      e.preventDefault();
      $(this).tab('show');
    });
    item.create_inputs(item.edit_form.find("#cust-name"),
        {fields: ['firstname', 'lastname', 'company', 'support_rep_id']}
    );
    item.create_inputs(item.edit_form.find("#cust-address"),
        {fields: ['country', 'state', 'address', 'postalcode']}
    );
    item.create_inputs(item.edit_form.find("#cust-contact"),
        {fields: ['phone', 'fax', 'email']}
    );
}
使用网格布局的编辑表单模板
此示例使用 Bootstrap 的网格系统:
<div class="tracks-edit">
    <div class="container-fluid form-body">
        <div class="row mb-3">
            <div id="edit-top" class="col-12 edit-border"></div>
        </div>
        <div class="row">
            <div id="edit-left" class="col-md-6 edit-border"></div>
            <div id="edit-right" class="col-md-6 edit-border"></div>
        </div>
    </div>
</div>
或:
<div class="tracks-edit">
    <div class="form-body">
        <div class="row">
            <div id="edit-top edit-border"></div>
            <div class="col-lg-6">
                    <div id="edit-left" class="edit-border"></div>
            </div>
            <div class="col-lg-6">
                    <div id="edit-right" class="edit-border"></div>
            </div>
        </div>
    </div>
</div>
function on_edit_form_created(item) {
    item.edit_options.width = 900;

    item.create_inputs(item.edit_form.find("#edit-top"), {
        fields: ['name']
    });

    item.create_inputs(item.edit_form.find("#edit-left"), {
        fields: ['album', 'artist', 'composer', 'media_type']
    });

    item.create_inputs(item.edit_form.find("#edit-right"), {
        fields: ['genre', 'milliseconds', 'bytes', 'unitprice']
    });
}
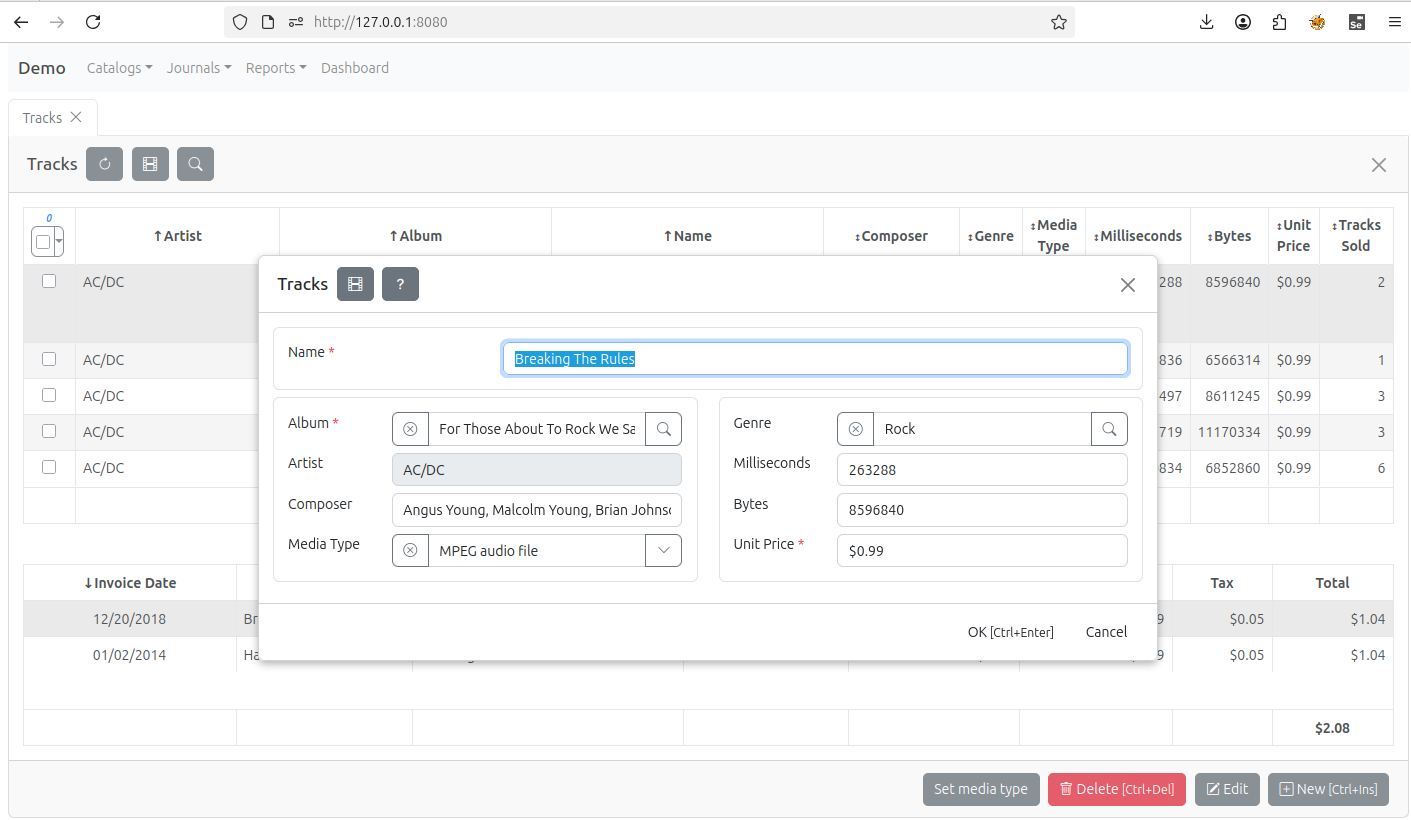
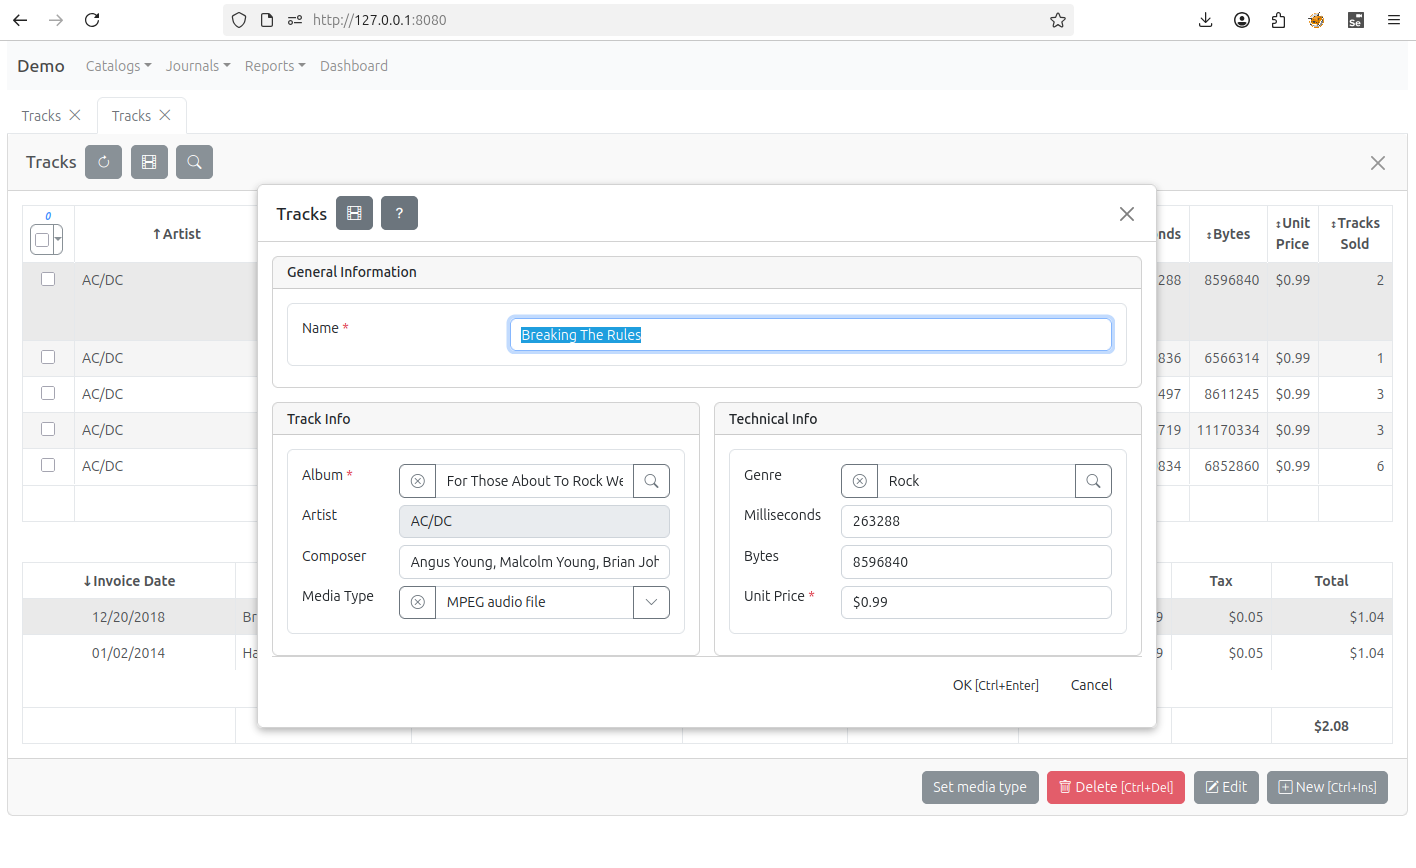
每个部分周围都有标题,例如 “曲目信息(Track Info)”/ “技术信息(Technical Info)”:
<div class="tracks-edit">
    <div class="card mb-3">
        <div class="card-header">
            <h6 class="mb-0">General Information</h6>
        </div>
        <div class="card-body">
            <div id="edit-top"></div>
        </div>
    </div>
    <div class="row g-3">
        <div class="col-md-6">
            <div class="card h-100">
                <div class="card-header">
                    <h6 class="mb-0">Track Info</h6>
                </div>
                <div class="card-body" id="edit-left"></div>
            </div>
        </div>
        <div class="col-md-6">
            <div class="card h-100">
                <div class="card-header">
                    <h6 class="mb-0">Technical Info</h6>
                </div>
                <div class="card-body" id="edit-right"></div>
            </div>
        </div>
    </div>
</div>
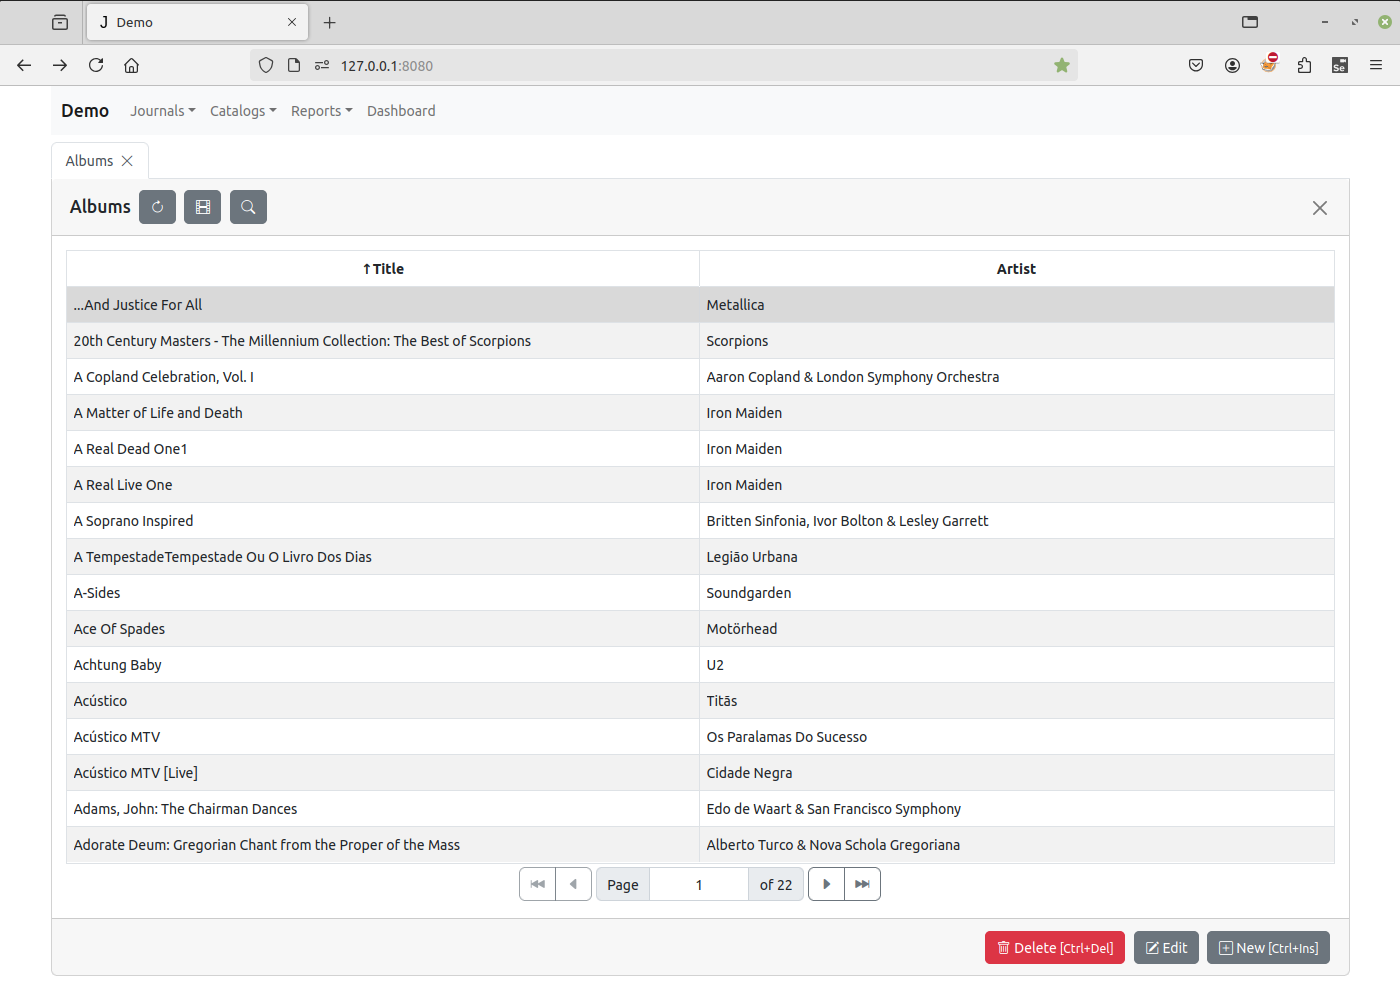
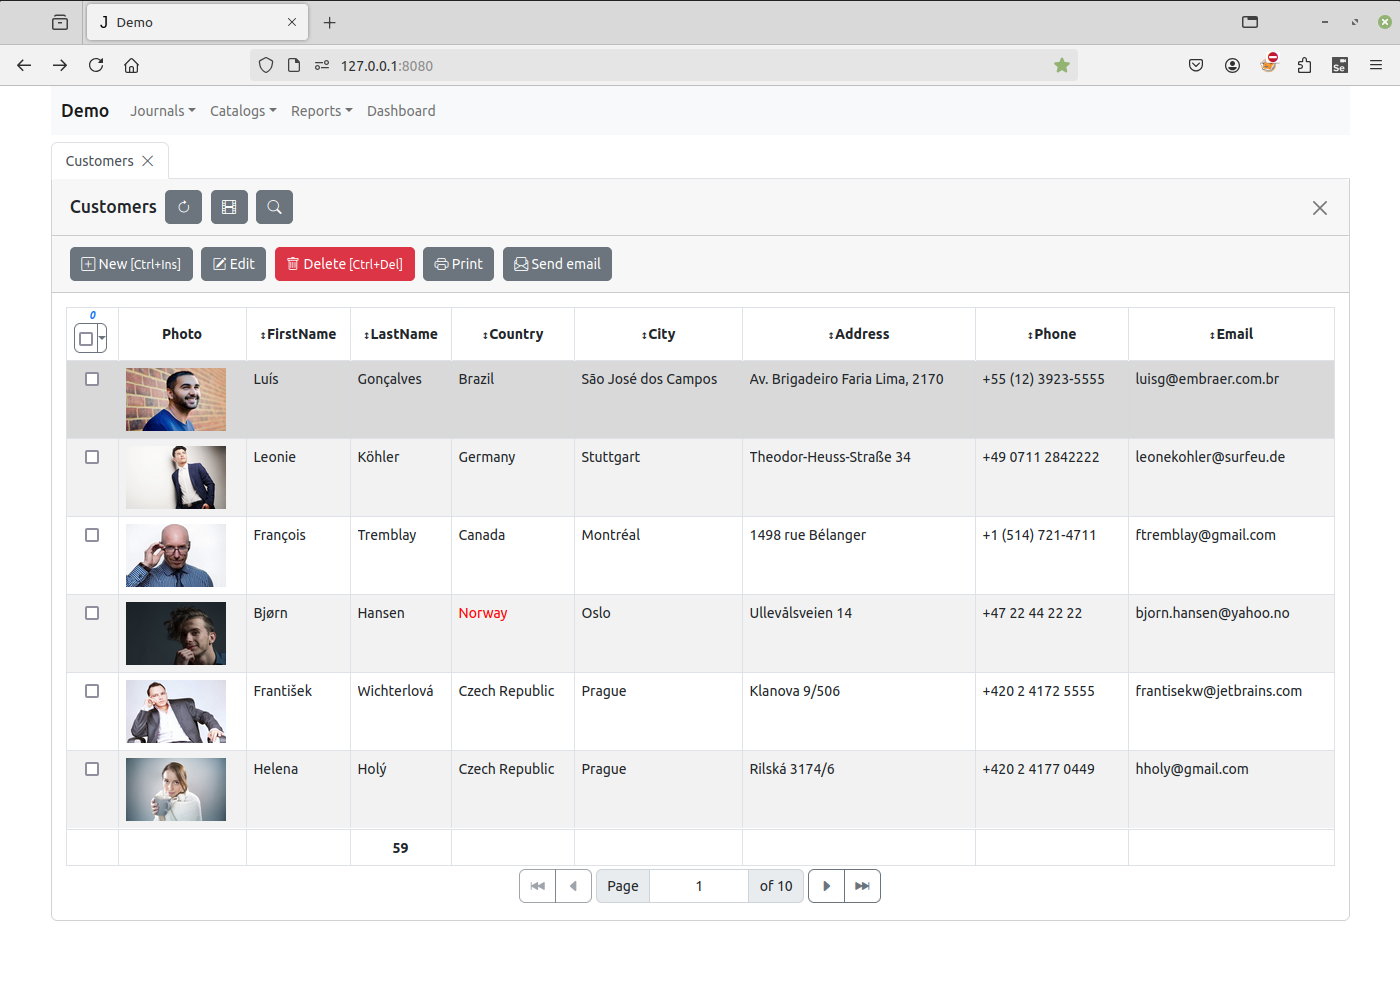
主表目录查看表单模板
在这个例子中,有一个 class 为 "form-header" 的 div。
id 为 "form-title" 的元素在任务的 on_view_form_created 方法中用于显示实体项的标题,并为其分配一个 JQuery onclick 事件来执行 view 方法以重新创建查看表单。
id 为 "selected-div" 和 "search-form" 的元素在主表目录组的 on_view_form_created 中用于 在点击右侧按钮选择值时显示查找字段的当前值,并相应地实现目录的搜索功能。
class 为 "view-table" 的 div 在任务的 on_view_form_created 事件处理程序中用于通过 create_table 方法创建一个表格来显示实体项数据:
if (item.view_form.find(".view-table").length) {
    if (item.init_table) {
        item.init_table(item, table_options);
    }
    item.create_table(item.view_form.find(".view-table"), table_options);
    item.open(true);
}
id 为 "report-btn" 的 div 在任务的 on_view_form_created 事件处理程序中用于用实体项 表白对话框 中定义的报告填充下拉按钮菜单项(如果它们存在)。
<div class="catalogs-view">
<div class="form-body">
<div class="form-header">
<h4 id="form-title" class="header-text"><a href="#"></a></h4>
<h5 id="selected-div" class="header-text" style="display: none">
<a id="selected-value" href="#"></a>
</h5>
<form id="search-form" class="form-inline pull-right">
<label class="control-label" for="search-input">Search by
<span class="label" id="search-fieldname"></span>
</label>
<input id="search-input" type="text" class="input-medium search-query" autocomplete="off">
<a id="search-field-info" href="#" tabindex="-1">
<span class="badge">?</span>
</a>
</form>
</div>
<div class="view-table">
</div>
</div>
<div class="form-footer">
<button id="delete-btn" class="btn expanded-btn pull-left" type="button">
<i class="icon-trash"></i> Delete<small class="muted"> [Ctrl+Del]</small>
</button>
<div id="report-btn" class="btn-group dropup">
<a class="btn expanded-btn dropdown-toggle" data-toggle="dropdown" href="#">
<i class="icon-print"></i> Reports
<span class="caret"></span>
</a>
<ul class="dropdown-menu bottom-up">
</ul>
</div>
<button id="edit-btn" class="btn expanded-btn" type="button">
<i class="icon-edit"></i> Edit
</button>
<button id="new-btn" class="btn expanded-btn" type="button">
<i class="icon-plus"></i> New<small class="muted"> [Ctrl+Ins]</small>
</button>
</div>
</div>
按钮在顶部的查看表单模板
在此示例中,移除了表单页脚 div,并将按钮放置在表单标题 div 中。 创建了 操作(Actions) 下拉按钮。代码与上一个示例相同。
<div class="customers-view">
<div class="form-body">
<div class="form-header">
<div id="action-btn" class="btn dropdown">
<a class="btn btn-secondary dropdown-toggle" href="#" role="button" data-bs-toggle="dropdown">
<i class="bi bi-display"></i>
Action
</a>
<ul class="dropdown-menu">
<li id="new-btn">
<a class="dropdown-item" href="#">
<i class="bi-plus-square"></i>
New<small class="muted"> [Ctrl+Ins]</small>
</a>
</li>
<li id="edit-btn"><a class="dropdown-item" href="#"><i class="bi-pencil-square"></i> Edit</a></li>
<li id="delete-btn">
<a class="dropdown-item" href="#">
<i class="bi-trash"></i>
Delete<small class="muted"> [Ctrl+Del]</small>
</a>
</li>
</ul>
<p></p>
<button id="email-btn" class="btn btn-secondary" type="button">
<i class="bi-pencil-square"></i> Email
</button>
<p></p>
<button id="print-btn" class="btn btn-secondary" type="button">
<i class="bi bi-printer"></i> Print
</button>
</div>
<div class="view-table">
</div>
</div>
</div>
</div>
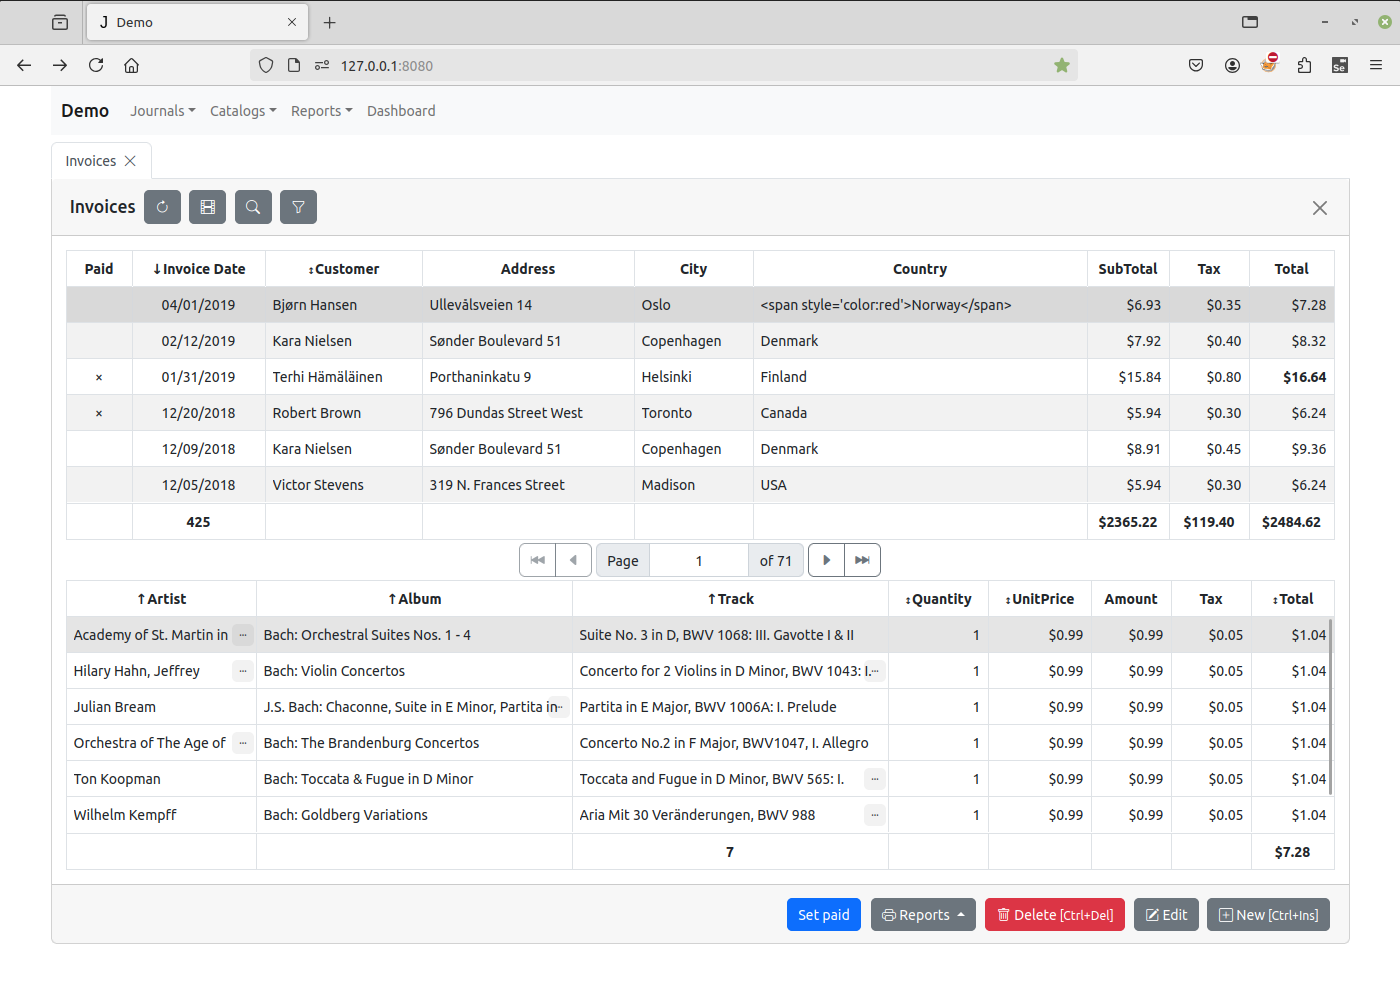
带明细表的查看表单模板
在此示例中,移除了 class 为 "view-table" 的 div, 并在 发票(Invoices) 台账的客户端模块中声明的 on_view_form_created 事件处理程序中为主表和明细表实体项创建了两个 div:"view-master" 和 "view-detail" 表格:
function on_view_form_created(item) {
    var height = $(window).height() - $('body').height() - 200 - 10;

    if (height < 200) {
        height = 200;
    }

    item.filters.invoicedate1.value = new Date(new Date().setYear(new Date().getFullYear() - 1));

    item.create_table(item.view_form.find(".view-master"), {
        height: height,
        sortable: true,
        show_footer: true,
        row_callback: function(row, it) {
            var font_weight = 'normal';
            if (it.total.value > 10) {
                font_weight = 'bold';
            }
            row.find('td.total').css('font-weight', font_weight);
        }
    });

    item.invoice_table.create_table(item.view_form.find(".view-detail"), {
            height: 200 - 4,
            dblclick_edit: false,
            column_width: {'track': '25%', 'album': '25%', 'artists': '10%'}
    });

    item.open(true);
}
<div class="invoices-view">
<div class="form-body">
<div class="form-header">
<h4 id="form-title" class="header-text"><a href="#"></a></h4>
<h5 id="filter-text" class="header-text pull-right"></h5>
</div>
<div class="view-master">
</div>
<div class="view-detail" style="margin-top: 4px; margin-bottom: 4px">
</div>
</div>
<div class="form-footer">
<button id="delete-btn" class="btn expanded-btn pull-left" type="button">
<i class="icon-trash"></i> Delete<small class="muted"> [Ctrl+Del]</small>
</button>
<div id="report-btn" class="btn-group dropup">
<a class="btn expanded-btn dropdown-toggle" data-toggle="dropdown" href="#">
<i class="icon-print"></i> Reports
<span class="caret"></span>
</a>
<ul class="dropdown-menu bottom-up">
</ul>
</div>
<button id="filter-btn" class="btn expanded-btn" type="button">
<i class="icon-filter"></i> Filter
</button>
<button id="edit-btn" class="btn expanded-btn" type="button">
<i class="icon-edit"></i> Edit
</button>
<button id="new-btn" class="btn expanded-btn" type="button">
<i class="icon-plus"></i> New<small class="muted"> [Ctrl+Ins]</small>
</button>
</div>
</div>